Showing posts with label week 6. Show all posts

Wednesday, July 8, 2009

MORE BLOCKS DONE

My relaxation time is making these blocks.

Patch as Patch Can
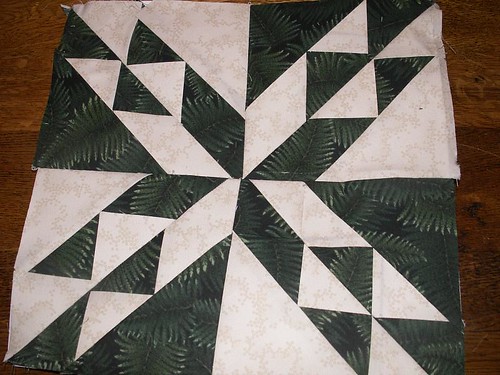
....WEEK 6......
what does that mean? These patches are put in so precisely to make the pattern, there seems to be no 'patch as can' about this block. Can you see I boobed on the dark fabric, I used the wrong side sometimes...Oh well!!


My Lucky Stars...WEEK 7
Oh yeah! With 69 pieces to this 8" - yes I stuck to that size crazy person -I cannot see anything 'lucky' in it, only how it went together - surprisingly easy!!


Morning Star 2 - WEEK 8
I really enjoyed making this little block, well 12" block, I am very happy with the way it turned out.


Fancy Stripes - WEEK 9
hmm more like cheaters Log Cabin really, this was sooo quick to make, it fairly flew through the sewing machine.


Bears Tracks... WEEK 10
A lovely block cos it is to do with Bears. I collect soft teddies or ornament's of bears so was very happy this was in the pack to make. Are they coming or going?


Chimneys & Cornerstones... WEEK 11
Not a lot to say of this cos it was another speedy one to make, love the secondary pattern you get when you link it with Courthouse Steps though. Nice one!


The Queen's X... WEEK 13
hee hee she was probably cross someone put those little triangles in her square!!!


Slowly but surely, I am catching up. Having fun whilst doing so too. :-)
Is this OK to put several in one posting or should they all be separate??

Thursday, February 12, 2009

Patch as Patch... Can't


Whew! I thought I wasn't going to get finished before Donna pulled the next block. Not my first choice of fabrics (the Aunt Gracie's yellow got pretty washed out) but I like the contrast. I'm hoping to get weeks 1-4 finished and posted soon. Is it OK to post "catch ups"?


Cheers, Nan

Wednesday, February 11, 2009

Em's block #6

Now this is suppose to be fun, right? And we are learning, right? With that said here is my block # 6.

It is not perfect, but I had fun and I learned a little too. I like this block. And will probably find time to do it again. With a little practice I think I could get it right.

Batch of Patches


I can't say I wasn't warned. I was almost afraid to even try this block after seeing all the problems and frustration others were having. Rebecca's wonderful paper piecing tutorial tempted me to try that method. And because several of you made the dang thing a second time, I hung my head in shame at the thought of not even trying it once. So grabbing the scraps laying about from working on little valentine projects I gave it my best shot. The first quadrant (lower right) was pretty bad and I did a lot of do-overs trying to get it square. By the time I made the final quad, I was getting the hang of it pretty well. I am amazed it came out at 12 & 1/2 inches, well except for the slightly wonky bottom right edge. I am so glad I didn't try this sucker in homespun. What a nightmare that would be!! So it looks like I've got myself a huge potholder or a tiny table-topper for Valentine's Day. Or not. It is definitely an orphan block because there will be no siblings bred in this sewing room. Okay, I'm ready to tackle the next surprise from Quilt Pixies jar of goodies. It couldn't be any harder....could it?

Sunday, February 8, 2009

Floribunda's patch

It's not perfect, but I think it's pretty good -- the secret for me was pressing just the seams and not the bias edges. No starch or sizing on this!

Please, Donna, can we have something with fewer triangles next week?

Heather - Week 6

Today's exercise in cussing was brought to me by Patch as Patch Can. Or can't in my case. I thought I'd take everyone's advice and paper piece this. I figured I'd fly right through this. The fabrics are left overs from a quilt I'm working on where the green is the sashing and the cream is the background. No problem, right?

I don't know if I'm just a quilting idiot today or what. I put this block together wrong in more ways that I'd have thought possible. I noticed when I finished it this time that the last two seams are way crooked. If I hadn't already picked out multiple tiny paper pieced seams today I'd have fixed those. But for now they can stay and I'll fix it when I get around to using this block in a quilt.

week6.jpg

Week 6 Take 2

I did this block again. I paper pieced it this time. I know. I know. I said that it was too hard to do. But I think I was preoccupied with other Saturday stuff and couldn't concentrate yesterday. Although I walked away in frustration last night, I kept thinking about this block and got up early this morning to try it again. (I never let a block get the better of me!) I was able to draw up the paper pieced pattern without any problem and I put the block together in less that an hour and a half! It's still not perfect, but it's a lot better!

I only wished I had used nicer fabrics. These are from my kid's scraps. I know that I said I would never make this block again, but now I have changed my mind. I am going to draw up another copy of this pattern for paper piecing and keep it in my files for future use. I really love this block! I really think that I will do it again!

Saturday, February 7, 2009

I'm renaming this block to "Beauty & The Beast"

.... because it is a beautiful block but it is a beast to make. I didn't have as many problems with the stretching thanks to the advice from others, but I had to rip out several pieces because I had sewn them backwards. Then when I put the big triangles on I lost quite a few points. I think Rebecca has the right idea with this one and that is to paper piece it. I may give it a try at some point since I really would like to learn paper piecing and I like this design. It will have to wait though since I've got to get back to my other projects.

Way Over My Head!!!


I may attempt this block later on this weekend or I may skip this week's block altogether, which is not necessarily a bad thing...I might understand what I am doing if I had one of you here WITH me, but I am just getting frustrated...I haven't even pieced two rows and I lost all my points...


Where did they go? Into HST never, never land.


It may be with me, but I would really like to say that I do not like her instructions very much and I am not advanced enough to be able to figure it out on my own.


Aaarrrggghhhh!


Loving all of your blocks though...one day this puppy will be able to run with the big dogs.

Marlene

Friday, February 6, 2009

Pssst! Keep an Eye Out for the Quilt Police!

I am about to reveal my latest Block Party block. It may be called "Patch as Patch Can" and Patch might be able to do this one, but I had a lot of trouble.After I had sewn the first quarter together, it didn't look at all like it was supposed to. I had the pieces all going the wrong way. I had to frog everything and start over. I laid the pieces out exactly as they were to go together and than it went a little better. My points are not the greatest, but if the quilt police don't see it, I think everything will be okay. I like the block, but it was a lot of work to get it to this point. That's the word for today, 'point'. Wish mine were all sharp and pointy.

Paper Piecing Week 6

I am going to paper piece this block. I will post all about it when I get to it. Have any of you paper pieced before?

Edited to include:


This is my finished block, construction time 1 hour 34 minutes, including picking out fabric and taking photos.
Supplies needed: ruler, starch, business card, iron, rotary cutter, and (not necessary) add a quarter ruler.

Starting with the paper foundations printed from EQ6 onto regular copy paper.  If I were doing a whole quilt I would use special paper as it is easier to tear.  I marked where the colors went, and the sequence in which I would sew the pieces.  You could draw out the block full size and cut apart the units and then remember to leave a seam allowance on the outside edges of the block.  You don't need a computer program to make the foundation units.
You place the fabric on the back of the paper and sew on the front.  I pin the first pieces to the paper to keep them in place.  

Hold the paper up to the light to make sure the placement is right.  I am using scraps so that is why I have some triangles already.  If you use smaller pieces to begin with, you will have less waste.
Sew on the printed side of the paper, starting beyond the seam allowance and sewing past the intersection.  Sew right on the line using a small stitch, this will make the paper tear easier.  You sew on the line between the sequencial numbers such as between 1 and 2, or 2 and 3.
View from the front of the block, after sewing the first seam.  You will trim the seams so if it isn't straight to the edge of the fabric it is ok.
Fold the paper back at the seam and trim using a regular ruler, the add a quarter ruler or freehand.


Oops, this one was sewn too close to the edge of the fabric.  I just tore the two pieces of the fabric off the paper and resewed them, I didn't pick out the seam.  If you need to, you can place a piece of transparent tape over the place in the paper you tore.  Then resew the seam.
Iron the fabric open.
Place the next piece of fabric over where you just trimmed, making sure to use a large enough piece to cover the third patch.  Place the fabric over the printed side of the paper to check the size of the fabric and make sure there is enough for seam allowance.

View of the printed side after two seams.
Press the fabric.
Here is where the business card comes into play.  Crease the paper on the next seam. 
Trim using a ruler to a quarter of an inch from the paper.
Front of the block after trimming.  
Use this edge to place the next piece of fabric, after measuring of course.  If the fabric piece ends up too small, sew another piece of the same fabric to cover the area, or pick the seam and try again with another larger piece.
Front of block after all the half square triangles are in place.
You are now ready for the large corner piece.  Fold back the seam with the card, tearing the paper a little where the thread crosses the sewing line.  Trim the excess.
Use this trimmed edge to add the corner piece of fabric.

Use the regular ruler to trim at the seam line, not the sewing line.  Been there, done that.
Trimmed unit.
This piece came up a little short, but that is ok.  The shortage is in the seam allowance and the piece covers the sewing line.
The eight units laid out.
These are the first two units to sew together.  
After sewing the two units together, I picked out the paper.  I ironed the seam open as there was some bulk that needed to be distributed.  This is the time for starch.  Because of the way you place your fabric, you will have bias edges.  Some people leave the paper in and just take it off the seam allowances after the seams are sewn.  I see the benefits of both ways.  But don't starch if you keep the paper in, it will just disinegrate!
The front of the two units.
To tear off the paper, hold close to the seam line and gently tear the paper toward you.  It should tear easily as the stitches were small. Don't be yanking on the paper as it will weaken the stitches and stretch the bias.
All four units together.  
I don't pin much but this is a good time.  Line up the seams.  
The back of the block.  You can see some paper still on the blocks, I don't stress over this.  It won't cause any problems.
Viola!

This is my pile of waste.  The pile on the left is big enough pieces to use in another block, the pile on the right is waste.